Posted: 2025-08-??
Last updated: 2026-04-15
|
On this guide I'll show you how to run a Sven Co-op 3.0 server on Linux using Wine (because Sven Co-op never received Linux releases until 5.0).
You can also follow this guide for any other old HL mod that never had releases for Linux (like Bumper Cars for example), but in this case I'm going to focus on one of my favorite Sven Co-op versions.
WARNING: This guide assumes that you're using a Debian-based distro and that you have some basic Linux knowledge. Also this guide assumes you know how to do port forwarding (ignore this if you're using a VPS).
Creating a Debian 10 debootstrap §
For this guide, we will use version 5.13 of Wine, as it was the last version to include interactivity in the HLDS console through the shell thanks to the "ncurses mode" of wineconsole, which was removed in later versions.
Since installing old versions of Wine IS A PAIN IN THE ASS (cuz it requires to use a lot of old libraries to compile an specific version), we will use a debootstrap with Debian 10 Buster (or 11 Bullseye) instead.
In order to create a debootstrap, you'll need to install such package first with sudo apt install debootstrap. After that, create a Debian 10 i386 debootstrap in your server with sudo debootstrap --arch=i386 buster /opt/debootstrap/d10i386 http://archive.debian.org/debian/.
The reason why I'm using i386 instead of amd64 is just for avoid installing i386 packages (which also helps to reduce the size on disk) and also because HLDS was designed for that architecture in the first place.
After creating the debootstrap, use this bash script to access to it (or in other words, chroot). It will mount some important directories which fixes some issues with programs like tmux.
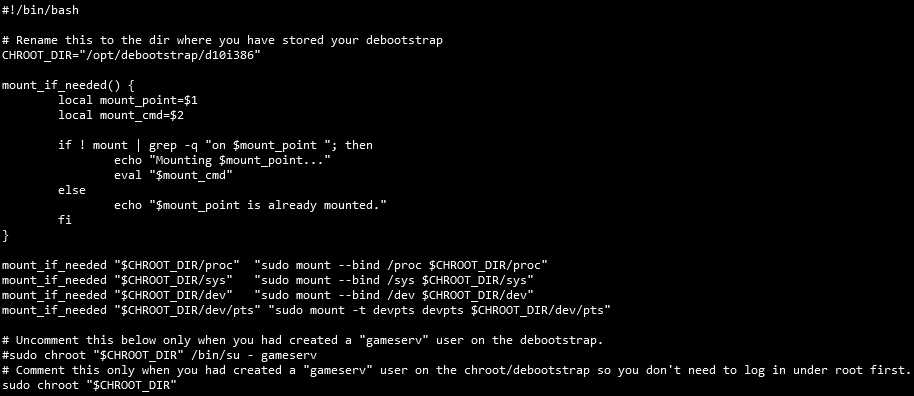
Remember to give the script execution permissions with sudo chmod +x chroot_d10i386.sh!
If everything went fine, then use ./chroot_d10i386.sh inside the directory where you have this script to start accessing/chrooting to your debootstrap.
[ Back to Top ]
Installing packages and setting up stuff §
Now inside your Debian 10 debootstrap, update the packages first and install system locales with these commands:
apt-get updateapt-get install locales -y && dpkg-reconfigure locales
The "locales" thing is just to tell the system the language to use. Is not necessary but most packages will cry without its presence. I just recommend setting it to en_US.UTF-8.
Now install the required packages for this:
apt-get install wine tmux wget unzip -y
This will install Wine, tmux (for leaving the server running in background), wget (for getting HLDS and Sven Co-op 3.0 files) and unzip (self-explanatory duh).
After installing the packages, create a new user for running the gameserver with adduser gameserv. Spam ENTER a bunch of times and now log in on there with su gameserv with the password you had set.
Now under the gameserv user, we will need to download Windows HLDS. Normally, you would use SteamCMD to obtain the HLDS files, but if you're lazy like me and want to have everything ready to go, you can simply obtain a pre-downloaded copy of HLDS 8684 (the last version before the disastrous 25th anniversary update) from this archive.org page.

Now get the Sven Co-op 3.0 files from headcrab.party's PubFiles (a ZIP made by me which adds some fixes with default maps and removes useless garbage) and unzip it inside your HLDS directory.

And you're ready to go.
BTW, before moving to the next step, do a echo "CHROOT" > /etc/debian_chroot so it will display a (CHROOT) tag under your shell username@host so that you don't get confused about whether or not you're in the debootstrap when you log back in.
[ Back to Top ]
Starting the server §
Before that, I recommend using this little bash script I always do every time I set up a new gameserver:

Save it as start_server.sh in the root directory of your HLDS, then give it exec permissions with chmod +x start_server.sh. Before starting, create a new tmux session and launch the script with ./start_server.sh.
If everything went fine, you should get someting like this...
99.6 fps  0/ 8 on           osprey
Console initialized.
Using breakpad crash handler
Setting breakpad minidump AppID = 70
Forcing breakpad minidump interfaces to load
Looking up breakpad interfaces from steamclient
Calling BreakpadMiniDumpSystemInit
Protocol version 48
Exe version 1.1.2.2/Stdio (valve)
Exe build: 18:42:28 Aug 29 2025 (4157)
STEAM Auth Server
Server IP address 0.0.0.0:27015
Could not get IPX address, IPX disabled
Reason:  WSAENOTSOCK
Looking up breakpad interfaces from steamclient
Calling BreakpadMiniDumpSystemInit

couldn't exec banned.cfg
couldn't exec listip.cfg
Connection to Steam servers successful.
   VAC secure mode is activated.
...which means your Sven Co-op 3.0 server is now UP!
In case you get some crashes after trying to launch the server, check if:
- The server's port is not being used. Change it from the bash script.
- If it's the first time you're doing this, execute the server once again. Usually it happens because it cannot connect to Steam servers and it crashs.
- You haven't deleted something in the process.
- Check the "Conclusion" section from the end of this page.
[ Back to Top ]
Testing if it's working §
If you don't have Sven Co-op 3.0, then get a copy from here (or this ZIP). The installation process is so fucking simple so I'm not going to explain it here, just make sure to disable HD models and campaign support options during install please.
After installing, restart Steam, go to your library and find the mod as literally "Sven Co-op" (it doesn't have an icon, and don't get confused by the other one).
After launching the game, try doing in the console connect your.server.ip:port to connect to your own server or you can just go to the server browser and add it to favorites (most of the times this doesn't work so don't use this option).
[ Back to Top ]
Configuring the server §
The server.cfg file is where you can change some server variables (called CVARs) such as the hostname and stuff like gravity, password, FastDL, etc.
Here's an example of a server.cfg with some generic Half-Life and Sven Co-op 3.0 CVARs.
Take in mind that in Sven Co-op, some maps can also have their own .cfg file which contains custom CVAR values which can override server ones (such as disabling mp_banana or mp_flashlight). Make sure to change them.
If you want to enable Sven Co-op's votes (which you can use by pressing V or by typing votemenu in console), change these values you can see on the example I left above. The default values are these:
"mp_votemaprequired" is "70""mp_votekickrequired" is "71.000000""mp_votebanrequired" is "81.000000""mp_votekill_respawndelay" is "15.0"
In case you're going to use the integrated votemap, consider also using this little command which grabs all your maps listed on your mapcycle.txt and it will adds all of them on your mapvote.cfg, so you don't need to add them manually each time you want to add a custom map:
sed 's/^/addvotemap /' mapcycle.txt > mapvote.cfg
BTW, if you hate how hard the game is and you feel weapons doesn't do a shit, it's because some maps are using a high skill/difficulty level. To fix that, you'll need to change first all the maps CFGs and replace their "skill" CVAR to 1. Use this sed command below:
sed -i 's/skill /skill 1/g' maps/*.cfg
And use this custom skill.cfg which is the one I'm currently using on the headcrab.party server. It increases health/HEV chargers durability and improved damage to some weapons (and also improves the medkit to give the triple of health so players don't need to wait 5 seconds to completely heal themselves).
[ Back to Top ]
Installing AMX Mod X and Metamod §
TBA
[ Back to Top ]
Conclusion §
This should cover all the basics things to run a good old and classic Sven Co-op 3.0 server on a Linux VPS/VDS/dedicated server/cloud/whatever.
However, there are some issues I would like to list here:
- Most maps will probably crash on newer HLDS builds (I used to use a really old HLDS build "5758" to fix this but that was starting to be a bored ass solution because you cannot get listed on Steam master servers) with an
Fix for Host_Error: ED_LoadFromFile: found · when expecting { error. This is because certain default maps (like hplanet) have "empty entities" which, in SteamPipe versions of Half-Life, cause both the server and the client to crash. To fix this, you will have to do it manually with BSPGuy, searching for these entities and deleting them (make sure to also conserve the CRC or else you'll get version mismatch errors).
- In the default map
osprey for some reason it uses models like !barney.mdl which causes to crash because the game cannot find such files. On the Sven Co-op 3.0 sever ZIP I shared here they're already included (they're just copypastes from their original HL models lmao) but you must need to copy them too into your models directory in your own Sven Co-op 3.0 copy.
- DON'T USE CTRL+C TO STOP THE SERVER, or else you will need to wait a long to the server to stop. Instead just write
quit.
- Wineconsole can be so fucking glitchy and it sometimes avoids you to read the latests lines (only if you're not with PuTTY or with your SSH on fullscreen). For that I recommend enabling the
-condebug parameter when launching your server and check the qconsole.log file on your HLDS directory. Be careful that such file can increase in size with the time. And also, this only works on one server instance.
- This version and any other such as the latest 4.8 (before the Steam standalone release) are not compatible with ReHLDS, it will crash due to the precache limit this thing has set.
Does this also works for WON and Xash3D FWGS? Of course, duh. The only thing that changes is the HLDS setup process. Everything else will works the same.
And if you want, you can try doing this on a newer version of Wine, that probably could improve performance a little bit but I don't know if the console will works unlike of how it was on 5.x.
[ Back to Top ]
|